基础
推荐博客
NIO的相关理论
[零拷贝]https://mp.weixin.qq.com/s?__biz=MzU0MzQ5MDA0Mw==&mid=2247483913&idx=1&sn=2da53737b8e8908cf3efdae9621c9698&chksm=fb0be89dcc7c618b0d5a1ba8ac654295454cfc2fa81fbae5a6de49bf0a91a305ca707e9864fc&scene=21#wechat_redirect
[NIO相关知识]https://mp.weixin.qq.com/s?__biz=MzU0MzQ5MDA0Mw==&mid=2247483907&idx=1&sn=3d5e1384a36bd59f5fd14135067af1c2&chksm=fb0be897cc7c61815a6a1c3181f3ba3507b199fd7a8c9025e9d8f67b5e9783bc0f0fe1c73903&scene=21#wechat_redirect
[NIO系列]http://ifeve.com/overview/
零拷贝
针对将文件从磁盘传输网络的另一方,通过读取、socket传输等方式。这个过程中需要进行多次拷贝、多次切换内核态/用户态,面对这些冗余操作进行的底层优化。
需要拷贝的文件会拷贝到内核态下的buffer中,向socket buffer中追加当前要发生的数据在kernel buffer中的位置和偏移量;根据socket buffer中的位置和偏移量直接将kernel buffer的数据copy到网卡设备(protocol engine)中。
IO相关知识
在进程需要操作I/O设备时,必须通过系统调用请求内核来完成这个动作。
在整个请求过程中,数据输入至buffer需要时间,而从buffer复制数据至进程也需要时间。因此根据在这两段时间内等待方式的不同,I/O动作可以分为以下五种模式:
- 阻塞I/O (Blocking I/O)
- 非阻塞I/O (Non-Blocking I/O)
- I/O复用(I/O Multiplexing)
- 信号驱动的I/O (Signal Driven I/O)
- 异步I/O (Asynchrnous I/O)
其中有两个重要的动作状态:
- 等待数据准备 (Waiting for the data to be ready)
- 将数据从内核拷贝到进程中 (Copying the data from the kernel to the process)
阻塞I/O (Blocking I/O)
默认情况下,所有的socket都是阻塞IO。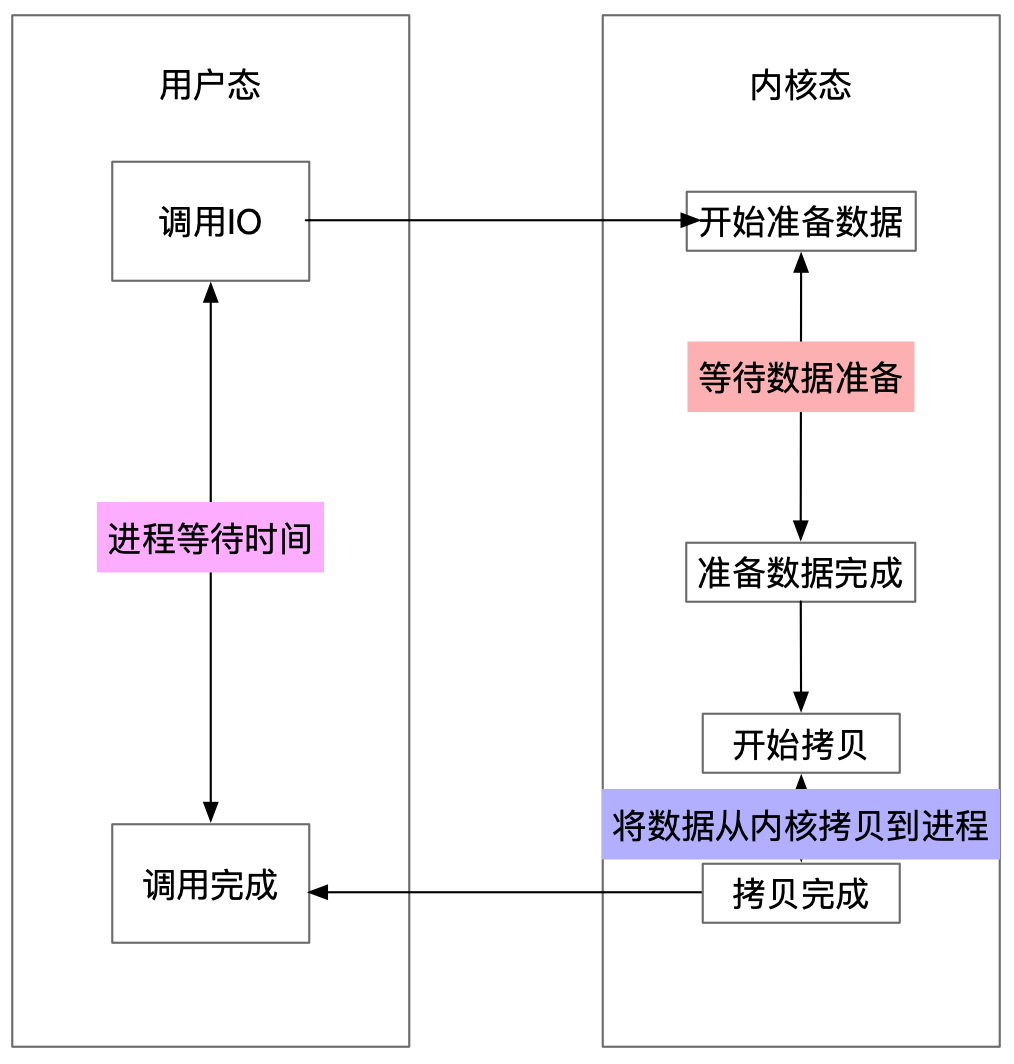
当用户进程调用了IO系统调用,内核就开始了IO的第一个阶段:等待数据准备。在网络请求中,都需要有一个网络下载的延迟时间,这个时候内核就要等待足够的数据到来。而在用户进程这边,整个进程会被阻塞。当内核一直等到数据准备好了,它就会将数据从内核中拷贝到用户内存,然后内核返回结果,用户进程才解除block的状态,重新运行起来。
所以,blocking IO的特点就是在IO执行的两个阶段都被block了。
非阻塞I/O (Non-Blocking I/O)
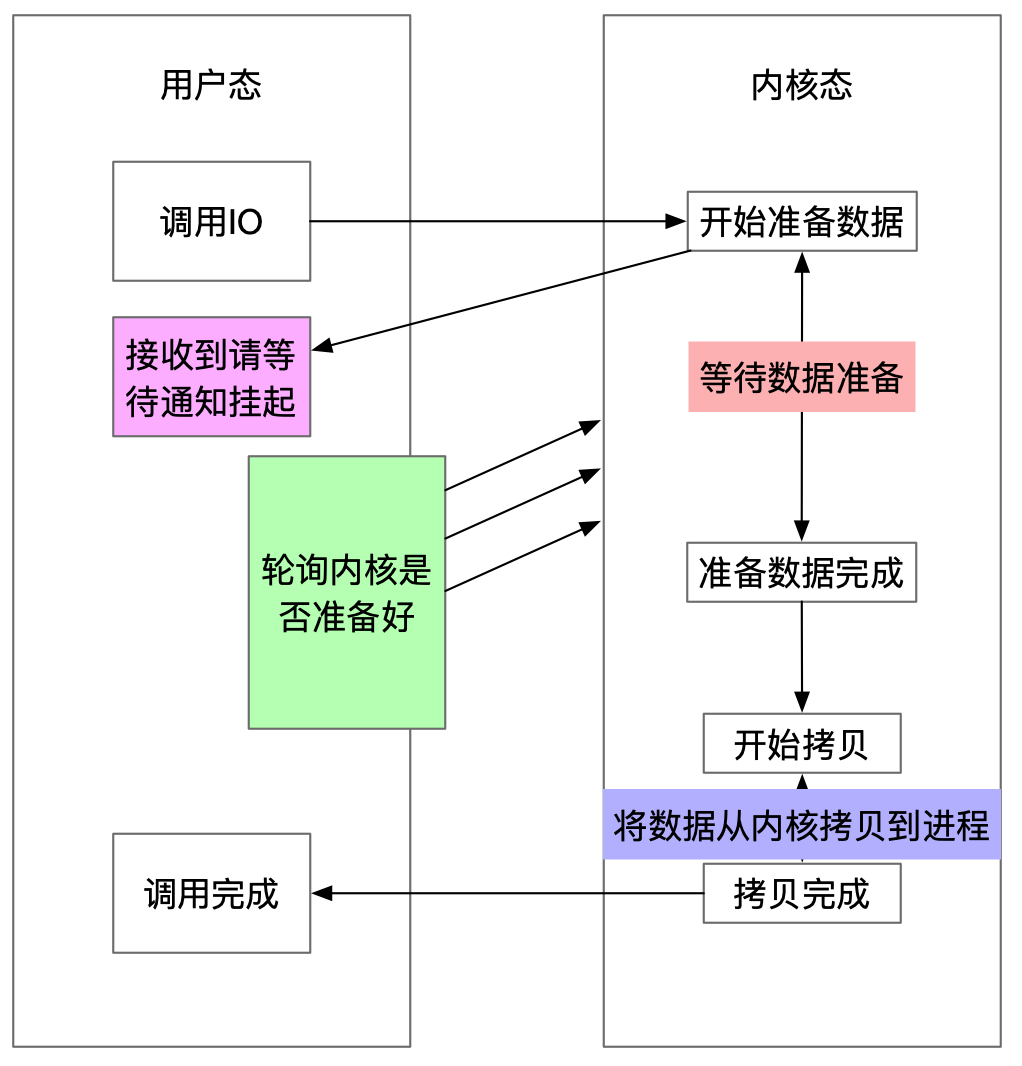
在阻塞IO的基础上,调用IO后会立即返回一个通知,告诉用户进程数据还没有准备好,进程就可以做其他的事情了,在这个过程中挂起的部分会不断轮询访问内核是否准备好,虽然这个过程浪费CPU时间;准备好后,就将数据拷贝到了用户内存并返回。
I/O复用(I/O Multiplexing)
select/epoll会不断的轮询所负责的连接,当某个连接有数据到达就会通知用户进程。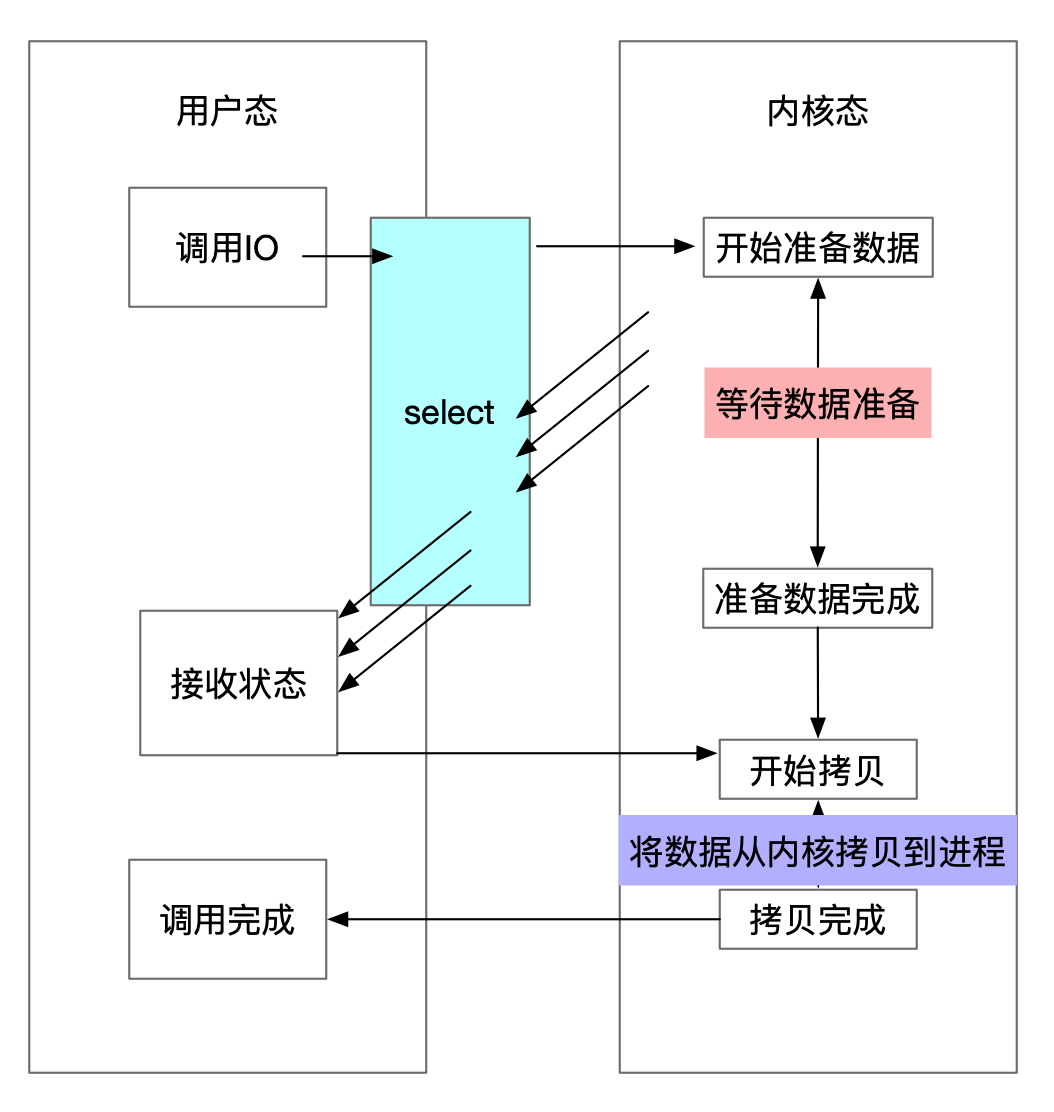
用select的优势在于它可以同时处理多个连接、所以如果处理的连接数不是很高的话、使用select/epoll的web server不一定比使用多线程加阻塞IO的web server性能更好、可能延迟还更大、select/epoll的优势并不是对于单个连接能处理得更快、而是在于能处理更多的连接。
整个用户的进程其实是一直被阻塞的、只不过进程是被select这个函数阻塞、而不是被socket IO给阻塞。
- 文件描述符fd
Linux的内核将所有外部设备都可以看做一个文件来操作,通过调用内核提供的系统调用;内核提供filede scriptor(fd,文件描述符)指向内核中一个结构体(文件路径,数据区,等一些属性)。而对一个socket的读写也会有相应的描述符:socketfd(socket描述符)。应用程序对文件的读写就体现在对描述符的读写完成。 - select
- select 函数监视的文件描述符,调用后select函数会阻塞,直到有描述符就绪(有数据 可读、可写、或者有except甚至超时)。当select函数返回后,可以通过遍历fdset,来找到就绪的描述符。
- 缺点:
- 1、select最大的缺陷就是单个进程所打开的FD是有一定限制的,它由FDSETSIZE设置,32位机默认是1024个,64位机默认是2048。
- 2、对socket进行扫描时是线性扫描,即采用轮询的方法,效率较低。当套接字比较多的时候,每次select()都要通过遍历FDSETSIZE个Socket来完成调度,不管哪个Socket是活跃的,都遍历一遍。这会浪费很多CPU时间。”如果能给套接字注册某个回调函数,当他们活跃时,自动完成相关操作,那就避免了轮询”,这正是epoll与kqueue做的。
- 3、需要维护一个用来存放大量fd的数据结构,这样会使得用户空间和内核空间在传递该结构时复制开销大。
- poll
- poll本质上和select没有区别。它没有最大连接数的限制,原因是它是基于链表来存储的。它将用户传入的数组拷贝到内核空间,然后查询每个fd对应的设备状态,如果设备就绪则在设备等待队列中加入一项并继续遍历,如果遍历完所有fd后没有发现就绪设备,则挂起当前进程,直到设备就绪或者主动超时,被唤醒后它又要再次遍历fd。这个过程经历了多次无谓的遍历。
- 缺点:
- 大量的fd的数组被整体复制于用户态和内核地址空间之间,而不管这样的复制是不是有意义。
- poll还有一个特点是“水平触发”,如果报告了fd后,没有被处理,那么下次poll时会再次报告该fd。
- epoll
- 相对于select和poll来说,epoll更加灵活,没有描述符限制。epoll使用一个文件描述符管理多个描述符,将用户关系的文件描述符的事件存放到内核的一个事件表中,这样在用户空间和内核空间的copy只需一次。
- epoll支持水平触发和边缘触发,最大的特点在于边缘触发,它只告诉进程哪些fd刚刚变为就绪态,并且只会通知一次。还有一个特点是,epoll使用“事件”的就绪通知方式,通过epollctl注册fd,一旦该fd就绪,内核就会采用类似callback的回调机制来激活该fd,epollwait便可以收到通知。
- 优点:
- 没有最大并发连接的限制,能打开的FD的上限远大于1024(1G的内存上能监听约10万个端口)。
- 效率提升,不是轮询的方式,不会随着FD数目的增加效率下降。只有活跃可用的FD才会调用callback函数;即Epoll最大的优点就在于它只管你“活跃”的连接,而跟连接总数无关,因此在实际的网络环境中,Epoll的效率就会远远高于select和poll。
- 内存拷贝,利用mmap()文件映射内存加速与内核空间的消息传递;即epoll使用mmap减少复制开销。
信号驱动的I/O (Signal Driven I/O)
信号驱动IO模型,应用进程告诉内核:当数据报准备好的时候,给我发送一个信号,对SIGIO信号进行捕捉,并且调用我的信号处理函数来获取数据报。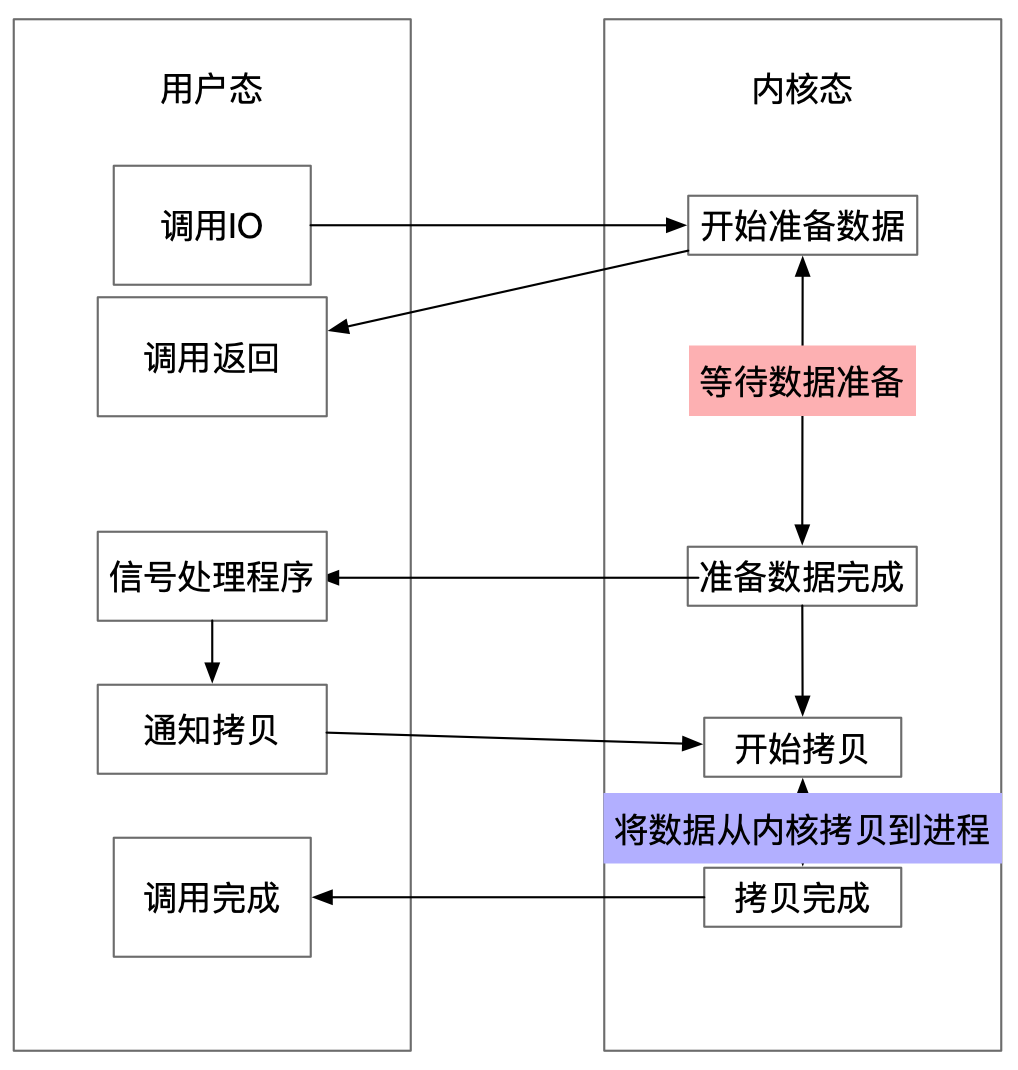
异步I/O
这个模型和前面的信号驱动I/O模型的主要区别是,在信号驱动的I/O中,内核告诉我们何时可以启动I/O操作,但是异步I/O时,内核告诉我们何时I/O操作完成。把所有的任务都交给内核去完成(包括将数据从内核拷贝到用户自己的缓冲区),内核完成之后,只需返回一个信号告诉用户进程已经完成就可以了。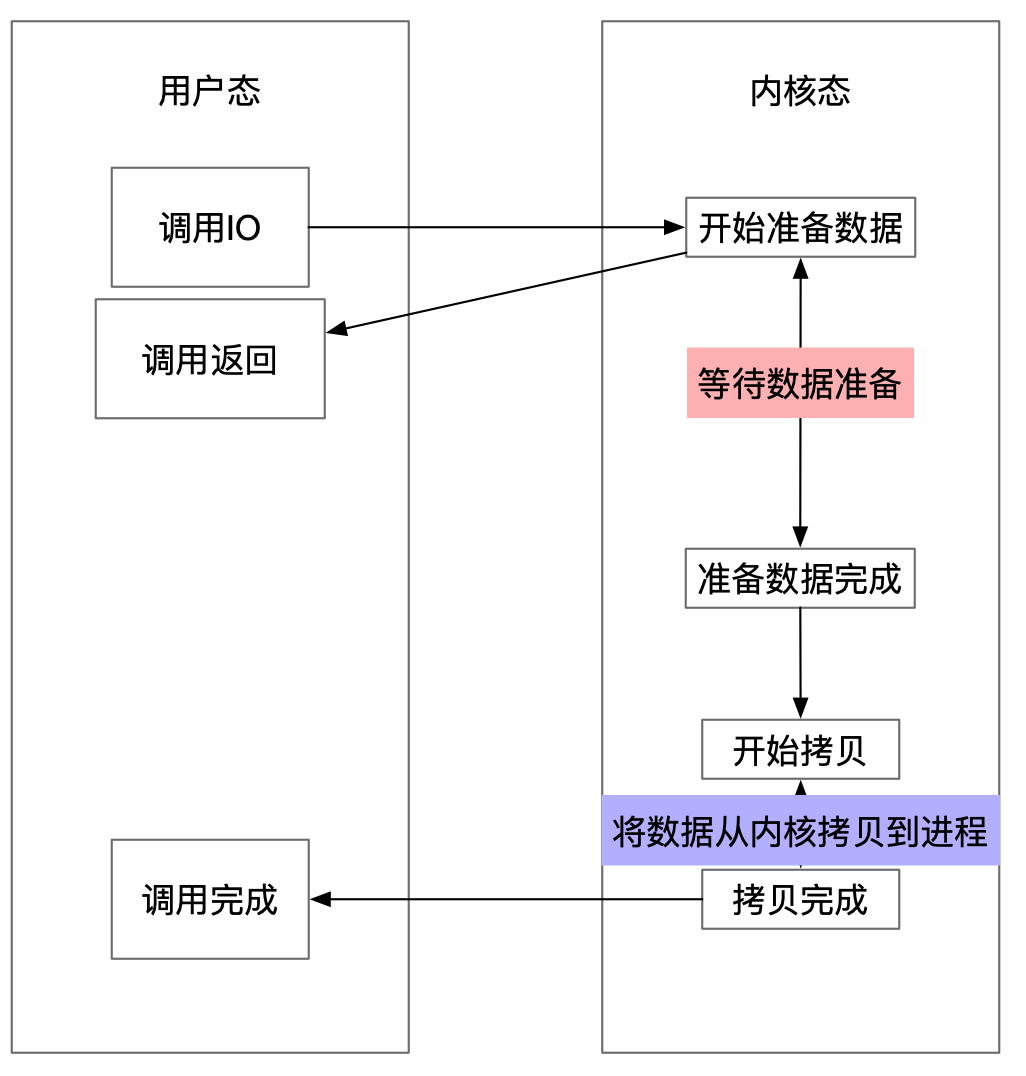
区别
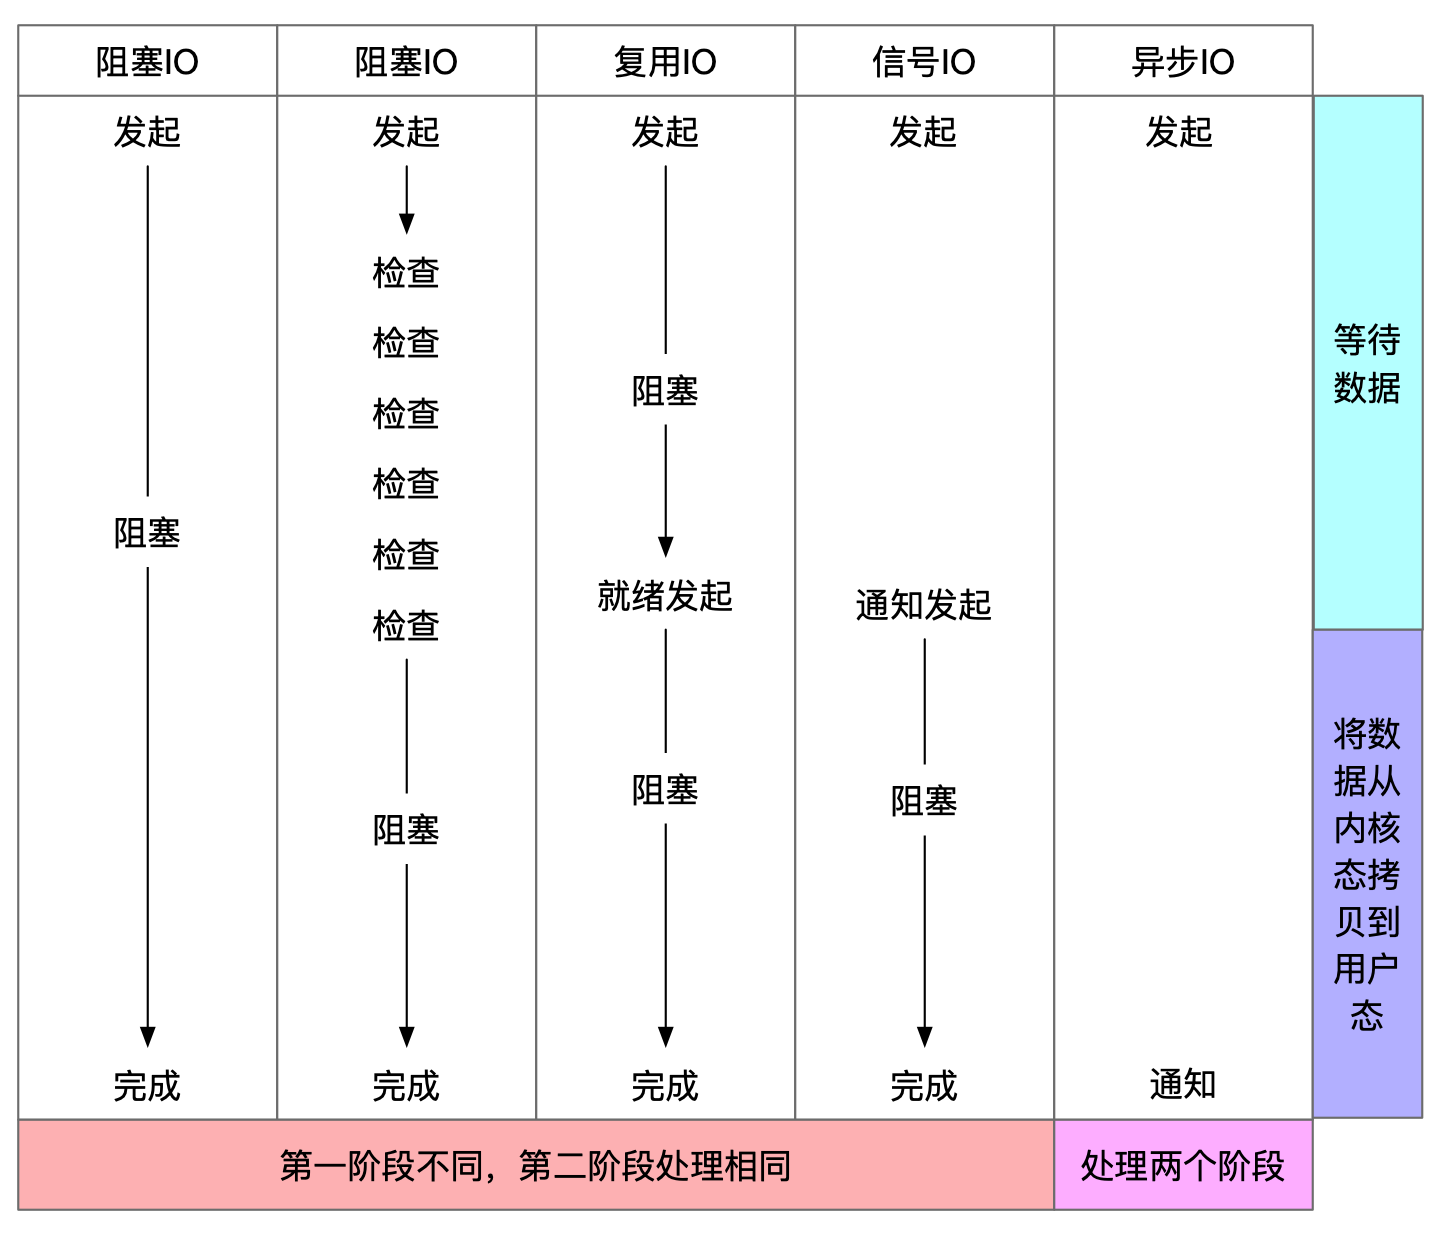
阻塞程度:阻塞IO>非阻塞IO>多路转接IO>信号驱动IO>异步IO,效率是由低到高的。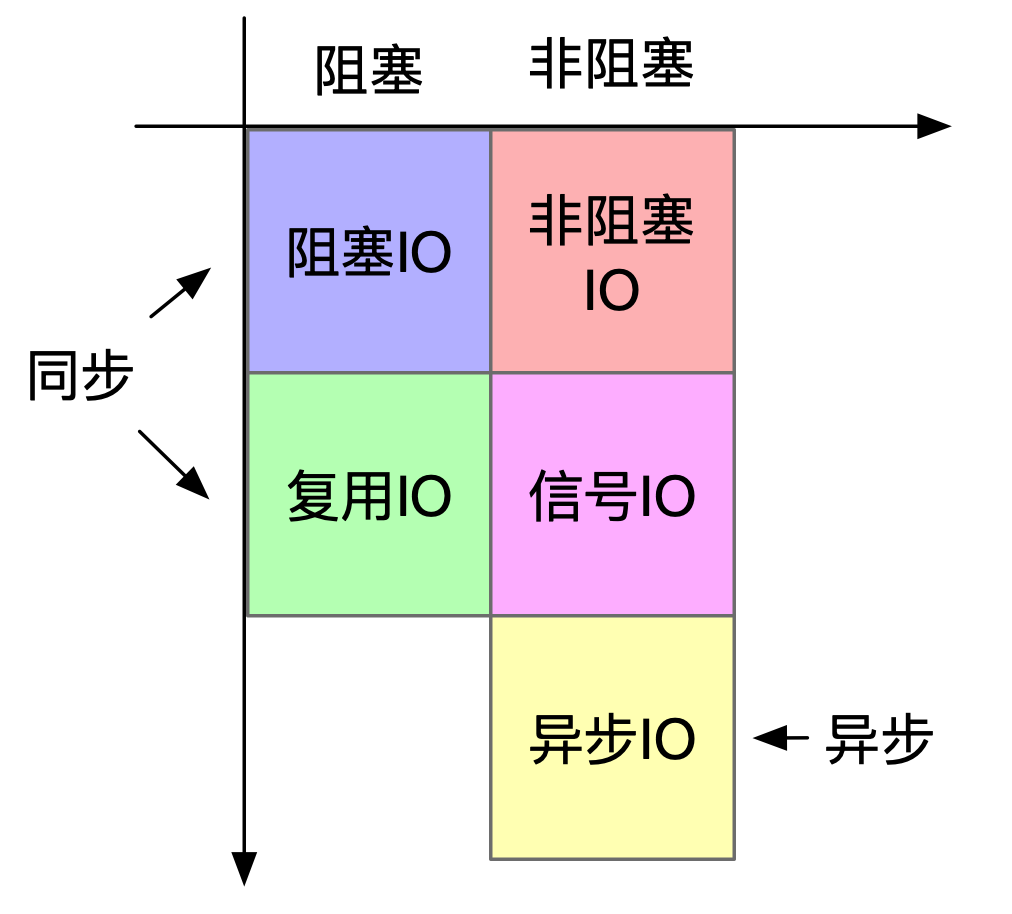
概述
NIO三大核心:Channel(通道)、Buffer(缓冲区)、Selector(选择器)。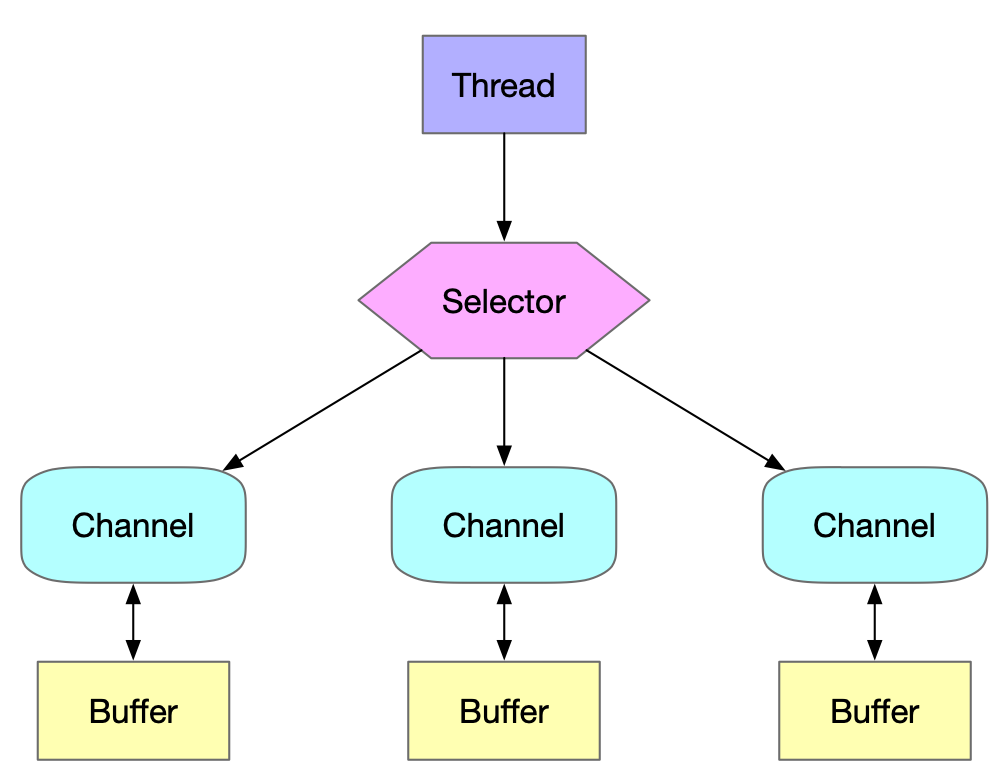
Channel 和 Buffer
Channel 有点象流。 数据可以从Channel读到Buffer中,也可以从Buffer 写到Channel中。
- 既可以从通道中读取数据,又可以写数据到通道。但流的读写通常是单向的。
- 通道可以异步地读写。
- 通道中的数据总是要先读到一个Buffer,或者总是要从一个Buffer中写入。
其中包含主要的channel
- FileChannel
- DatagramChannel
- SocketChannel
- ServerSocketChannel
包含主要的buffer
- ByteBuffer
- CharBuffer
- DoubleBuffer
- FloatBuffer
- IntBuffer
- LongBuffer
- ShortBuffer
selector
Selector允许单线程处理多个 Channel。如果你的应用打开了多个连接(通道),但每个连接的流量都很低,使用Selector就会很方便。
Channel 管道
其中的主要实现有:
- FileChannel
从文件中读写数据。 - DatagramChannel
能通过UDP读写网络中的数据。 - SocketChannel
能通过TCP读写网络中的数据。 - ServerSocketChannel
可以监听新进来的TCP连接,像Web服务器那样。对每一个新进来的连接都会创建一个SocketChannel。
FileChannel
FileChannel是一个连接到文件的通道。可以通过文件通道读写文件。
FileChannel无法设置为非阻塞模式,它总是运行在阻塞模式下。
打开FileChannel
|
从FileChannel读取数据
调用多个read()方法之一从FileChannel中读取数据。
read()方法返回的int值表示了有多少字节被读到了Buffer中。如果返回-1,表示到了文件末尾。int bytesRead = inChannel.read(buf);
向FileChannel写数据
使用FileChannel.write()方法向FileChannel写数据,该方法的参数是一个Buffer。while(buf.hasRemaining()) {
channel.write(buf);
}
关闭FileChannel
用完FileChannel后必须将其关闭。channel.close();
FileChannel的position方法
可以通过调用position()方法获取FileChannel的当前位置。也可以通过调用position(long pos)方法设置FileChannel的当前位置。
FileChannel的size方法
FileChannel实例的size()方法将返回该实例所关联文件的大小。long fileSize = channel.size();
FileChannel的truncate方法
可以使用FileChannel.truncate()方法截取一个文件。截取文件时,文件将中指定长度后面的部分将被删除。channel.truncate(1024);
FileChannel的force方法
FileChannel.force()方法将通道里尚未写入磁盘的数据强制写到磁盘上。出于性能方面的考虑,操作系统会将数据缓存在内存中,所以无法保证写入到FileChannel里的数据一定会即时写到磁盘上。要保证这一点,需要调用force()方法。
force()方法有一个boolean类型的参数,指明是否同时将文件元数据(权限信息等)写到磁盘上。channel.force(true);
SocketChannel
Java NIO中的SocketChannel是一个连接到TCP网络套接字的通道。可以通过以下2种方式创建SocketChannel:
- 打开一个SocketChannel并连接到互联网上的某台服务器。
- 一个新连接到达ServerSocketChannel时,会创建一个SocketChannel。
打开 SocketChannel
下面是SocketChannel的打开方式
- SocketChannel socketChannel = SocketChannel.open();
- socketChannel.connect(new InetSocketAddress(“localhost”, 8080));
在完成找到连接够需要通过下面方式确认连接
- socketChannel.isConnectionPending()
- socketChannel.finishConnect()
关闭 SocketChannel
当用完SocketChannel之后调用SocketChannel.close()关闭SocketChannel
- socketChannel.close();
从 SocketChannel 读取数据
要从SocketChannel中读取数据,调用一个read()。
写入 SocketChannel
写数据到SocketChannel用的是SocketChannel.write()方法,该方法以一个Buffer作为参数。
非阻塞模式
可以设置 SocketChannel 为非阻塞模式(non-blocking mode)。设置之后,就可以在异步模式下调用connect()。在当前模式下,调用connect函数并不会立即触发或者阻塞触发,而是需要通过后续的select函数触发操作。socketChannel.configureBlocking(false);非阻塞模式与选择器
在非阻塞模式下提供一个选择器selector组合使用,可以能完成更完善的操作。
例子
以下是完成一个客户端的工作,配合下面的ServerSocketChannel服务端测试public static void selector() throws IOException {
Selector selector = Selector.open();
SocketChannel socketChannel = SocketChannel.open();
socketChannel.configureBlocking(false);
socketChannel.connect(new InetSocketAddress("127.0.0.1", 8080));
socketChannel.register(selector, SelectionKey.OP_CONNECT);
while (true) {
selector.select();
Iterator<SelectionKey> iterator = selector.selectedKeys().iterator();
while (iterator.hasNext()) {
System.out.println(selector.selectedKeys().size());
SelectionKey next = iterator.next();
iterator.remove();
if (next.isConnectable()) {
System.out.println("连接服务端成功");
SocketChannel channel = (SocketChannel) next.channel();
if (channel.isConnectionPending()) {
channel.finishConnect();
}
channel.register(selector, SelectionKey.OP_WRITE);
} else if (next.isReadable()) {
readerSocket((SocketChannel) next.channel());
} else if (next.isWritable()) {
writeSocket((SocketChannel) next.channel());
}
}
}
}
private static void readerSocket(SocketChannel channel) throws IOException {
ByteBuffer byteBuffer = ByteBuffer.allocate(100);
int len = channel.read(byteBuffer);
if (len > 0) {
byteBuffer.flip();
while (byteBuffer.hasRemaining()) {
System.out.println("客户端收到:"+(char)byteBuffer.get());
}
byteBuffer.clear();
}
}
public static void writeSocket(SocketChannel socketChannel) throws IOException {
CharsetEncoder encoder = Charset.forName("UTF-8").newEncoder();
socketChannel.write(encoder.encode(CharBuffer.wrap("client")));
System.out.println("客户端发送结束");
}
ServerSocketChannel
打开 ServerSocketChannel
通过调用 ServerSocketChannel.open() 方法来打开ServerSocketChannel。ServerSocketChannel serverSocketChannel = ServerSocketChannel.open();
关闭 ServerSocketChannel
通过调用ServerSocketChannel.close() 方法来关闭ServerSocketChannelserverSocketChannel.close();
监听新进来的连接
通过 ServerSocketChannel.accept() 方法监听新进来的连接。当 accept()方法返回的时候,它返回一个包含新进来的连接的 SocketChannel。因此, accept()方法会一直阻塞到有新连接到达。SocketChannel socketChannel = serverSocketChannel.accept();
非阻塞模式
ServerSocketChannel可以设置成非阻塞模式。在非阻塞模式下,accept() 方法会立刻返回,如果还没有新进来的连接,返回的将是null。serverSocketChannel.configureBlocking(false);
例子
|
DatagramChannel
DatagramChannel是一个能收发UDP包的通道。它发送和接收的是数据包。
打开 DatagramChannel
|
接收数据
通过receive()方法从DatagramChannel接收数据。将接收到的数据包内容复制到指定的Buffer. 如果Buffer容不下收到的数据,多出的数据将被丢弃。ByteBuffer buf = ByteBuffer.allocate(48);
buf.clear();
channel.receive(buf);
发送数据
通过send()方法从DatagramChannel发送数据。String newData = "time:" + System.currentTimeMillis();
ByteBuffer buf = ByteBuffer.allocate(48);
buf.clear();
buf.put(newData.getBytes());
buf.flip();
int bytesSent = channel.send(buf, new InetSocketAddress("localhost", 1019));
连接到特定的地址
可以将DatagramChannel“连接”到网络中的特定地址的。由于UDP是无连接的,连接到特定地址并不会像TCP通道那样创建一个真正的连接。而是锁住DatagramChannel ,让其只能从特定地址收发数据。
Pipe
管道是2个线程之间的单向数据连接。Pipe有一个source通道和一个sink通道。数据会被写到sink通道,从source通道读取。
创建管道
|
向管道写数据
要向管道写数据,需要访问sink通道。Pipe.SinkChannel sinkChannel = pipe.sink();
String newData = "time:" + System.currentTimeMillis();
ByteBuffer buf = ByteBuffer.allocate(48);
buf.clear();
buf.put(newData.getBytes());
buf.flip();
while(buf.hasRemaining()) {
sinkChannel.write(buf);
}
从管道读取数据
从读取管道的数据,需要访问source通道。Pipe.SourceChannel sourceChannel = pipe.source();
ByteBuffer buf = ByteBuffer.allocate(48);
int bytesRead = sourceChannel.read(buf);
Buffer
Java NIO中的Buffer用于和NIO通道进行交互。NIO和传统IO(一下简称IO)之间第一个最大的区别是,IO是面向流的,NIO是面向缓冲区的。
Buffer的基本用法
步骤如下:
- 1.写入数据到Buffer
- 2.调用flip()方法
- 3.从Buffer中读取数据
- 4.调用clear()方法或者compact()方法
当向buffer写入数据时,buffer会记录下写了多少数据。一旦要读取数据,需要通过flip()方法将Buffer从写模式切换到读模式。在读模式下,可以读取之前写入到buffer的所有数据。
一旦读完了所有的数据,就需要清空缓冲区,让它可以再次被写入。有两种方式能清空缓冲区:调用clear()或compact()方法。clear()方法会清空整个缓冲区。compact()方法只会清除已经读过的数据。任何未读的数据都被移到缓冲区的起始处,新写入的数据将放到缓冲区未读数据的后面。
例子
|
例子2
|
Buffer的capacity,position,limit和mark
缓冲区本质上是一块可以写入数据,然后可以从中读取数据的内存。这块内存被包装成NIO Buffer对象,并提供了一组方法,用来方便的访问该块内存。
他具有以下三个属性
- capacity:缓冲区数组的总长度。
- position:下一个要操作的数据元素的位置。
- limit:缓冲区数组中不可操作的下一个元素的位置:limit<=capacity。
- mark:用于记录当前position的前一个位置或者默认是-1。
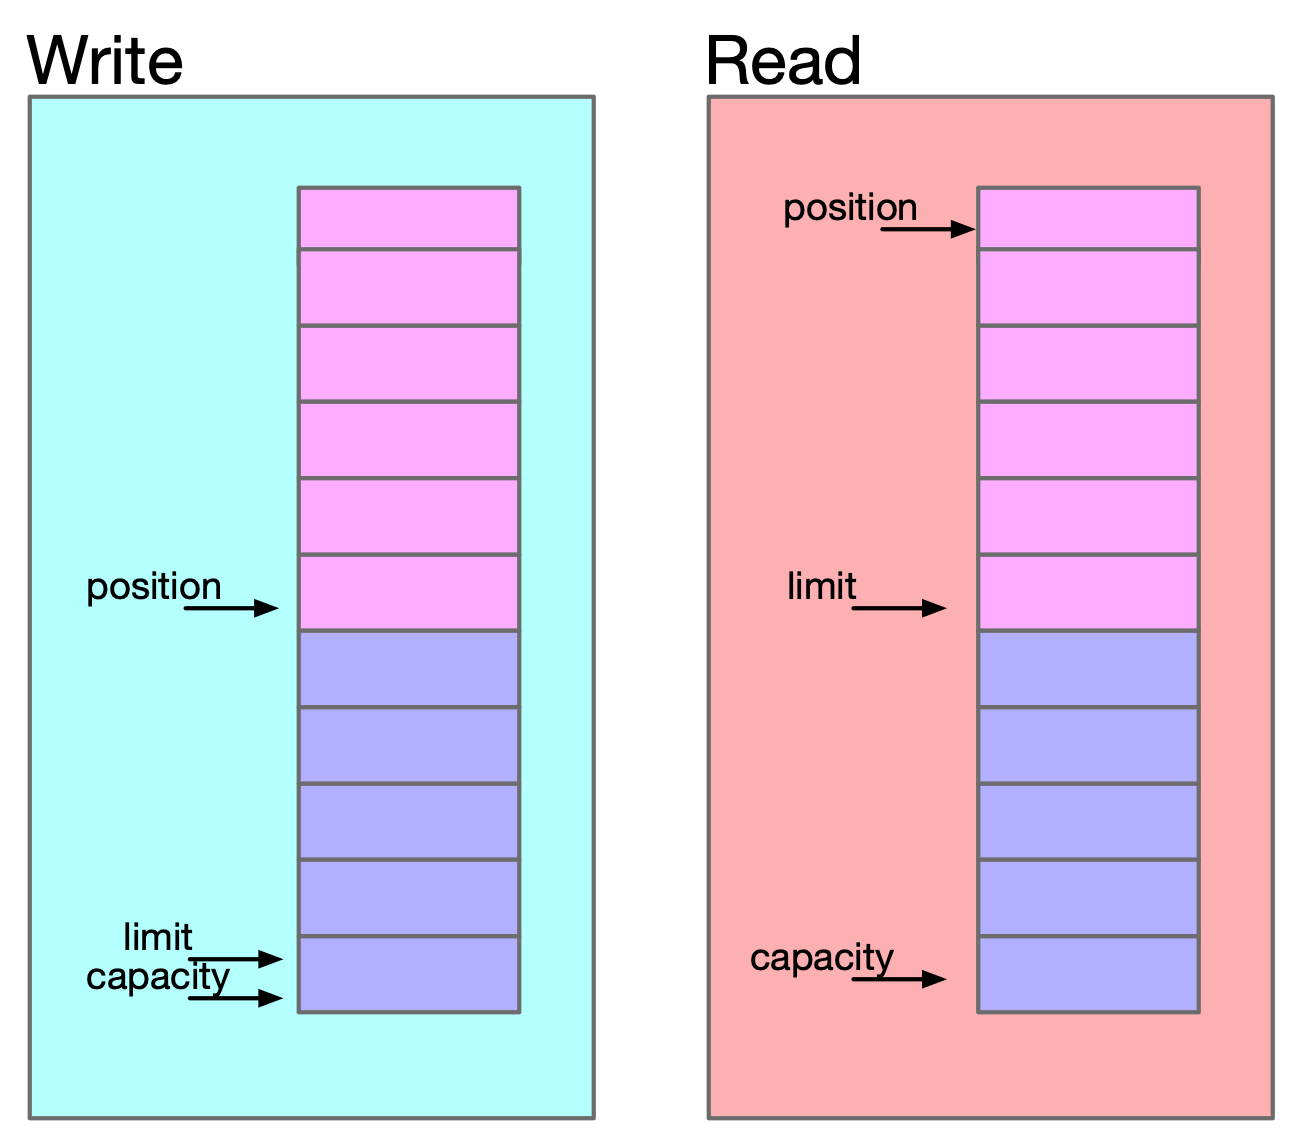
position和limit的含义取决于Buffer处在读模式还是写模式。不管Buffer处在什么模式,capacity的含义总是一样的。
capacity
作为一个内存块,Buffer有一个固定的大小值,也叫“capacity”。一旦Buffer满了,需要将其清空(通过读数据或者清除数据)才能继续写数据往里写数据。
position
当你写数据到Buffer中时,position表示当前的位置。初始的position值为0.当一个byte、long等数据写到Buffer后,position会向前移动到下一个可插入数据的Buffer单元。position最大可为capacity – 1.
当读取数据时,也是从某个特定位置读。当将Buffer从写模式切换到读模式,position会被重置为0。当从Buffer的position处读取数据时,position向前移动到下一个可读的位置。
limit
在写模式下,Buffer的limit表示你最多能往Buffer里写多少数据。 写模式下,limit等于Buffer的capacity。
当切换Buffer到读模式时, limit表示你最多能读到多少数据。因此,当切换Buffer到读模式时,limit会被设置成写模式下的position值。换句话说,你能读到之前写入的所有数据(limit被设置成已写数据的数量,这个值在写模式下就是position)
mark
通过调用Buffer.mark()方法,可以标记Buffer中的一个特定的position,之后可以通过调用Buffer.reset()方法恢复到这个position。
Buffer的类型
- ByteBuffer
- MappedByteBuffer
- CharBuffer
- DoubleBuffer
- FloatBuffer
- IntBuffer
- LongBuffer
- ShortBuffer
Buffer的分配
每一个Buffer类都有一个allocate方法。下面是一个分配1024字节capacity的ByteBuffer的例子。
ByteBuffer buf = ByteBuffer.allocate(1024);
向Buffer中写数据
- channel.read(buf)
- buf.put(xx)
flip()方法
flip方法将Buffer从写模式切换到读模式。调用flip()方法会将position设回0,并将limit设置成之前position的值。
这里可以在上述例子中看出来// 初始化
ByteBuffer byteBuffer = ByteBuffer.allocate(1000);
// 读取数据到buffer,写模式状态
int len = fileChannel.read(byteBuffer);
if (len != -1) {
// 转为读模式状态,需要从buffer中读取之前写入的数据
byteBuffer.flip();
while (byteBuffer.hasRemaining()) {
System.out.println((char) byteBuffer.get());
}
byteBuffer.clear();
从Buffer中读取数据
- channel.write(buf)
- buf.get()
rewind()方法
Buffer.rewind()将position设回0,所以你可以重读Buffer中的所有数据。limit保持不变,仍然表示能从Buffer中读取多少个元素(byte、char等)。
clear()与compact()方法
一旦读完Buffer中的数据,需要让Buffer准备好再次被写入。可以通过clear()或compact()方法来完成。
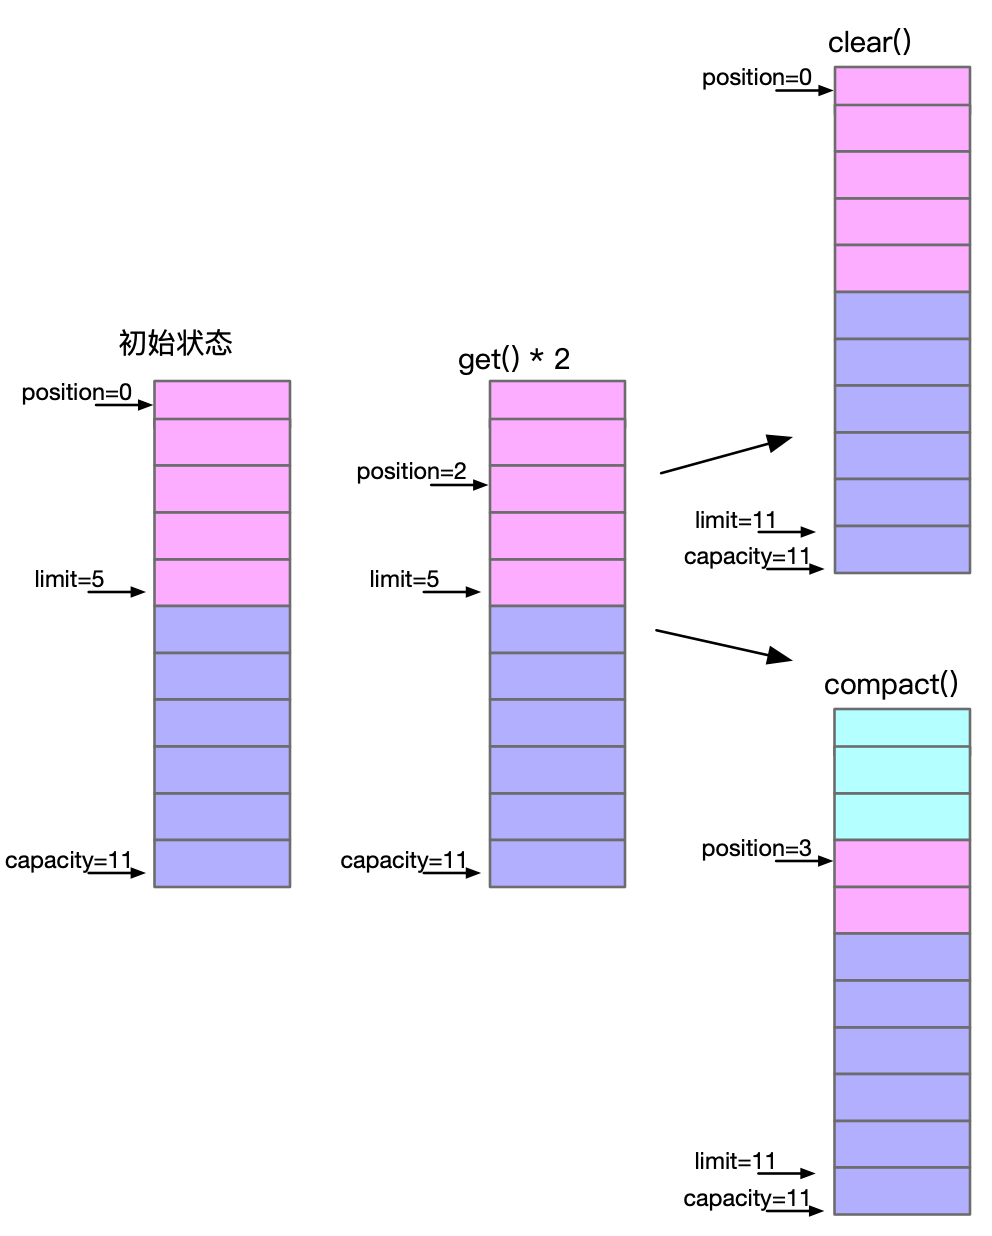
如果调用的是clear()方法,position将被设回0,limit被设置成 capacity的值。Buffer中的数据并未清除,只是这些标记告诉我们可以从哪里开始往Buffer里写数据。如果Buffer中有一些未读的数据,调用clear()方法,数据将“被遗忘”,意味着不再有任何标记会告诉你哪些数据被读过,哪些还没有。
compact()方法将所有未读的数据拷贝到Buffer起始处。然后将position设到最后一个未读元素正后面。limit属性依然像clear()方法一样,设置成capacity。现在Buffer准备好写数据了,但是不会覆盖未读的数据。
例子
mark()与reset()方法
通过调用Buffer.mark()方法,可以标记Buffer中的一个特定position。之后可以通过调用Buffer.reset()方法恢复到这个position。
equals()与compareTo()方法
可以使用equals()和compareTo()方法比较两个Buffer。
equals()
满足下列条件(比较剩余元素)
- 有相同的类型(byte、char、int等)。
- Buffer中剩余的byte、char等的个数相等。
- Buffer中所有剩余的byte、char等都相同。
compareTo()方法
比较两个Buffer的剩余元素(byte、char等), 如果满足下列条件,则认为一个Buffer“小于”另一个Buffe
- 第一个不相等的元素小于另一个Buffer中对应的元素 。
- 所有元素都相等,但第一个Buffer比另一个先耗尽(第一个Buffer的元素个数比另一个少)。
Scatter/Gather
scatter / gather经常用于需要将传输的数据分开处理的场合,例如传输一个由消息头和消息体组成的消息,你可能会将消息体和消息头分散到不同的buffer中,这样你可以方便的处理消息头和消息体。
- 分散(scatter)从Channel中读取是指在读操作时将读取的数据写入多个buffer中。因此,Channel将从Channel中读取的数据“分散(scatter)”到多个Buffer中。
- 聚集(gather)写入Channel是指在写操作时将多个buffer的数据写入同一个Channel,因此,Channel 将多个Buffer中的数据“聚集(gather)”后发送到Channel。
Scattering Reads
Scattering Reads是指数据从一个channel读取到多个buffer中。
例子
|
上述代码可以看出,由于我们限制了每个buffer的大小,因此,在装满第一个buffer的时候,按照顺序会将channel内的数据继续插入到下一个buffer中。
Gathering Writes
Gathering Writes是指数据从多个buffer写入到同一个channel。如下图描述:
例子
|
将数据写入到channel,注意只有position和limit之间的数据才会被写入。
通道间的数据传输
transferFrom()
将字节从给定的可读字节通道传输到此通道的文件中。
例子
|
transferTo()
将字节从此通道的文件传输到给定的可写字节通道。
例子
|
Selector
Selector(选择器)是Java NIO中能够检测一到多个NIO通道,并能够知晓通道是否为诸如读写事件做好准备的组件。这样,一个单独的线程可以管理多个channel,从而管理多个网络连接。
为什么使用Selector?
在操作数据流量不高的前提下,线程的创建开销非常大,为了完成一个线程解决问题。
Selector的创建
通过调用Selector.open()方法创建一个Selector。Selector selector = Selector.open();
向Selector注册通道
为了将Channel和Selector配合使用,必须将channel注册到selector上。channel.configureBlocking(false);
SelectionKey key = channel.register(selector, Selectionkey.OP_READ);
监听的事件
与Selector一起使用时,Channel必须处于非阻塞模式下。这意味着不能将FileChannel与Selector一起使用,因为FileChannel不能切换到非阻塞模式。而套接字通道都可以。
SelectionKey,用于监听该类事件:
- OP_READ:读取操作的操作设置位。
- OP_WRITE:写操作的操作设置位。
- OP_CONNECT:套接字连接操作的操作设置位。
- OP_ACCEPT:套接字接收操作的操作设置位。
SelectionKey
此处收到的对象为SelectionKeypublic abstract class SelectionKey {
protected SelectionKey() { }
// 通过SelectionKey对象获取其监听的Channel通道
public abstract SelectableChannel channel();
// 通过SelectionKey对象获取其所属的选择器Selector
public abstract Selector selector();
// 告诉此密钥是否有效。一个键在创建时有效,并一直保持到它被取消、它的通道关闭或它的选择器关闭为止
public abstract boolean isValid();
// 请求取消此键的通道与其选择器的注册。 返回后,该键将无效,并将被添加到其选择器的取消键集中。 在下一次选择操作期间,该键将从所有选择器的键集中删除。
public abstract void cancel();
// 检索此键的兴趣集。保证返回的集合将只包含对这个密钥的通道有效的操作位。
public abstract int interestOps();
// 将此键的兴趣集设置为给定的值。可以随时调用此方法。 它是否阻塞以及阻塞多长时间取决于实现。
public abstract SelectionKey interestOps(int ops);
// 类型
public static final int OP_READ = 1 << 0;
public static final int OP_WRITE = 1 << 2;
public static final int OP_CONNECT = 1 << 3;
public static final int OP_ACCEPT = 1 << 4;
// 检索此键的就绪操作集。保证返回的集合将只包含对这个密钥的通道有效的操作位。
public abstract int readyOps();
// 状态
public final boolean isReadable() { return (readyOps() & OP_READ) != 0; }
public final boolean isWritable() { return (readyOps() & OP_WRITE) != 0; }
public final boolean isConnectable() { return (readyOps() & OP_CONNECT) != 0; }
public final boolean isAcceptable() { return (readyOps() & OP_ACCEPT) != 0; }
// 附件
private volatile Object attachment = null;
private static final AtomicReferenceFieldUpdater<SelectionKey,Object>
attachmentUpdater = AtomicReferenceFieldUpdater.newUpdater(
SelectionKey.class, Object.class, "attachment"
);
// 将给定的对象附加到此键。稍后可以通过attachment方法检索附加的对象。 一次只能附加一个对象; 调用此方法会导致丢弃任何先前的附件。 可以通过附加null来丢弃当前附件。
public final Object attach(Object ob) {
return attachmentUpdater.getAndSet(this, ob);
}
// 检索当前附件。
public final Object attachment() {
return attachment;
}
}
通过Selector选择通道
一旦向Selector注册了一或多个通道,就可以调用几个重载的select()方法。
- int select():阻塞到至少有一个通道在你注册的事件上就绪了。
- int select(long timeout):最长会阻塞timeout毫秒(参数)。
- int selectNow():不会阻塞,不管什么通道就绪都立刻返回。此方法执行非阻塞的选择操作。如果自从前一次选择操作后,没有通道变成可选择的,则此方法直接返回零。
- select()方法返回的int值表示有多少通道已经就绪。
wakeUp()
某个线程调用select()方法后阻塞了,即使没有通道已经就绪,也有办法让其从select()方法返回。只要让其它线程在第一个线程调用select()方法的那个对象上调用Selector.wakeup()方法即可。阻塞在select()方法上的线程会立马返回。
如果有其它线程调用了wakeup()方法,但当前没有线程阻塞在select()方法上,下个调用select()方法的线程会立即“醒来(wake up)”。
close()
用完Selector后调用其close()方法会关闭该Selector,且使注册到该Selector上的所有SelectionKey实例无效。通道本身并不会关闭。