相关博客:
[YUV图片原理]https://yangandmore.github.io/2019/03/14/%E5%9B%BE%E7%89%87YUV%E6%95%B0%E6%8D%AE%E6%A0%BC%E5%BC%8F/
[RGB图片原理]https://yangandmore.github.io/2019/03/27/%E5%9B%BE%E7%89%87RGB%E6%95%B0%E6%8D%AE%E6%A0%BC%E5%BC%8F/
[libyuv for android库编译和简单使用]https://yangandmore.github.io/2019/03/07/libYUV%E7%BC%96%E8%AF%91/
[libturbojpeg for android库编译和简单使用]https://yangandmore.github.io/2019/03/08/libjpeg-turbo%E7%BC%96%E8%AF%91/
[yuv-tool for android库的项目]https://yangandmore.github.io/2020/07/13/yuv-tool%E5%B7%A5%E5%85%B7%E7%B1%BB/
[turbo-jpeg-tool for android库的项目]<>
一、简介
Google提供了一套Image的开源库libyuv(git clone https://chromium.googlesource.com/libyuv/libyuv),实现对各种yuv数据之间的转换,包括数据转换,裁剪,缩放,旋转。
这里由于有墙,所以可以在github中clone这个https://github.com/bilibili/libyuv.git
我的环境:
centenOS7+ndkr16b+cmake
mac10.14+ndkr16b+cmake
这里两款系统都编译成功,windows则没有试过。
二、编译
1.clone
这个就不说了
网站在上面
2.修改文件夹名称
修改clone下来的文件夹名称为jnixxx
|
\jni
3.增加Application.mk文件
这里可以直接编译,也可以编译指定架构。
在jni文件夹中添加Application.mk文件:APP_PLATFORM := android-19
APP_ABI := x86_64
此时的结构如下xxx
|
\jni
|
\Application.mk
4.清空
在xxx目录下,也就是与jni文件夹同级的目录下运行
需要记住这里必须在每次编译前都需要做的事情ndk-build clean
否则不会生成最新的库
5.编译
最后就是编译了
在xxx目录下,也就是与jni文件夹同级的目录下运行ndk-build
如果在第3不没有添加mk文件,就会生成所有能打出来的库,如果编写了mk文件,就会打出指定架构的库文件。
6.静态库与动态库
如果如上所操作你只会得到.a的静态库,而动态库需要在上述方法过程中修改一个文件Andorid.mk。这个文件在jni文件夹中,# This is the Android makefile for libyuv for both platform and NDK.
LOCAL_PATH:= $(call my-dir)
include $(CLEAR_VARS)
LOCAL_CPP_EXTENSION := .cc
LOCAL_SRC_FILES := \
source/compare.cc \
source/compare_common.cc \
source/compare_neon64.cc \
source/compare_gcc.cc \
source/convert.cc \
source/convert_argb.cc \
source/convert_from.cc \
source/convert_from_argb.cc \
source/convert_to_argb.cc \
source/convert_to_i420.cc \
source/cpu_id.cc \
source/planar_functions.cc \
source/rotate.cc \
source/rotate_argb.cc \
source/rotate_mips.cc \
source/rotate_neon64.cc \
source/row_any.cc \
source/row_common.cc \
source/row_mips.cc \
source/row_neon64.cc \
source/row_gcc.cc \
source/scale.cc \
source/scale_any.cc \
source/scale_argb.cc \
source/scale_common.cc \
source/scale_mips.cc \
source/scale_neon64.cc \
source/scale_gcc.cc \
source/video_common.cc
# TODO(fbarchard): Enable mjpeg encoder.
# source/mjpeg_decoder.cc
# source/convert_jpeg.cc
# source/mjpeg_validate.cc
ifeq ($(TARGET_ARCH_ABI),armeabi-v7a)
LOCAL_CFLAGS += -DLIBYUV_NEON
LOCAL_SRC_FILES += \
source/compare_neon.cc.neon \
source/rotate_neon.cc.neon \
source/row_neon.cc.neon \
source/scale_neon.cc.neon
endif
LOCAL_EXPORT_C_INCLUDES := $(LOCAL_PATH)/include
LOCAL_C_INCLUDES += $(LOCAL_PATH)/include
# 生成的库名称
LOCAL_MODULE := libyuv-static
LOCAL_MODULE_TAGS := optional
# 生成静态库还是动态库
# BUILD_STATIC_LIBRSRY 静态库
# BUILD_SHARED_LIBRARY 动态库
include $(BUILD_STATIC_LIBRARY)
可以看到这是Andorid.mk文件中的内容。
可以看到注释中写的两个地方,只需要修改后重复上面的步骤就可以了。
三、使用
nv21 & nv12转为I420
libyuv在完成我们的需求的前提,是需要我们的I420图片格式,也即YUV420P。在使用libyuv工具中都提前需要他的I420格式,才能做进一步的操作。这里必须了解YUV的存储格式。(https://yangandmore.github.io/2019/03/14/%E5%9B%BE%E7%89%87YUV%E6%95%B0%E6%8D%AE%E6%A0%BC%E5%BC%8F/#more)
所以首先我们需要使用:NV12ToI420和NV12ToI420来完成该功能。
在包中的convert.h文件中可以看到很多的XXX转I420的函数:...
// Convert NV12 to I420.
LIBYUV_API
int NV12ToI420(const uint8* src_y, int src_stride_y,
const uint8* src_uv, int src_stride_uv,
uint8* dst_y, int dst_stride_y,
uint8* dst_u, int dst_stride_u,
uint8* dst_v, int dst_stride_v,
int width, int height);
// Convert NV21 to I420.
LIBYUV_API
int NV21ToI420(const uint8* src_y, int src_stride_y,
const uint8* src_vu, int src_stride_vu,
uint8* dst_y, int dst_stride_y,
uint8* dst_u, int dst_stride_u,
uint8* dst_v, int dst_stride_v,
int width, int height);
...
这两个函数只是其中,用到最多的函数。
这里的参数比较多,逐一了解(这里以nv21为例):
src_y 和 src_vu:这里应该可以看出来,是nv21的Y数据和vu数据。因此我们需要获取nv21的y数据指针和vu数据指针。
src_stride_y 和src_stride_vu:这里分别指向了他们前面形参的宽度,YUV知识中知道,数据大小 = Y + U + v。而这里的是420,因此数据为Y + u/4 + v/4,而Y、U、V分别都是width*height。因此数据大小 = width\*height + (width*height)/4 + (width*height)/4 = (width*height)*(3/2)。这些都是420总数和各分量的算术。这里就可以知道y的分量宽度为width,而vu的宽度为(width/2)+(width/2) = width。
dst_y、dst_u、dst_v:三者分别为I420数据的Y、U、V分量数据。而他们后面带的int参数都指向他们各自的宽度。
最后则是图片的宽、高。
例:
这样我们就可以使用两个函数,来完成从nv21转向I420的格式了uint8* nv21ToI420(uint8* nv21, int width, int height, long size) {
jint size_Y = width * height;
jint size_U = (width >> 1) * (height >> 1);
uint8 * nv21_Y = nv21;
uint8 * nv21_UV = nv21 + size_Y;
uint8 * i420 = static_cast<uint8 *>(malloc(size));
uint8 * i420_Y = i420;
uint8 * i420_U = i420 + size_Y;
uint8 * i420_V = i420 + size_Y + size_U;
libyuv::NV21ToI420(nv21_Y, width, nv21_UV,
width, i420_Y, width,
i420_U, width >> 1, i420_V, width >> 1,
width, height);
return i420;
}
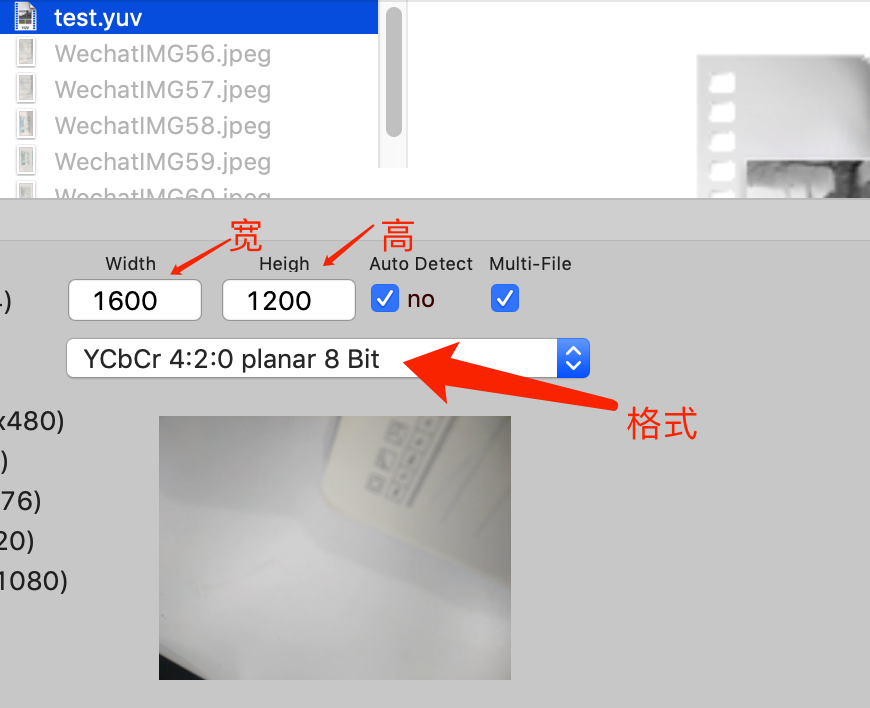
在我们查看结果时,必须使用YUV图片查看器,并且调试到该图片的宽、高、格式,才能看到。
github
I420旋转
使用I420Rotate用于图片旋转,在枚举类中设定的有固定4个:0、90、180、270。作为函数最后一个形参。typedef enum RotationMode {
kRotate0 = 0, // No rotation.
kRotate90 = 90, // Rotate 90 degrees clockwise.
kRotate180 = 180, // Rotate 180 degrees.
kRotate270 = 270, // Rotate 270 degrees clockwise.
// Deprecated.
kRotateNone = 0,
kRotateClockwise = 90,
kRotateCounterClockwise = 270,
} RotationModeEnum;
int I420Rotate(const uint8* src_y, int src_stride_y,
const uint8* src_u, int src_stride_u,
const uint8* src_v, int src_stride_v,
uint8* dst_y, int dst_stride_y,
uint8* dst_u, int dst_stride_u,
uint8* dst_v, int dst_stride_v,
int src_width, int src_height, enum RotationMode mode);
这里的参数和开始的NV21ToI420很像,模式也差不多。使用起来也确实一模一样
前面6个参数为Y、U、V的数据集和他们各自的宽度。
后7到12位,也即6个参数为旋转后的Y、U、V的数据集和他们各自的宽度。需要注意是旋转后的宽度。
最后是此时yuv的宽高、和刚刚说的旋转方向。但是后面两个参数是原数据的图片宽高。
例:
这里是使用该函数来旋转90度的照片。uint8* I420Scale(uint8* i420, int width, int height, long size) {
jint size_Y = width * height;
jint size_U = (width >> 1) * (height >> 1);
uint8 * i420_Y = i420;
uint8 * i420_U = i420 + size_Y;
uint8 * i420_V = i420 + size_Y + size_U;
uint8 * i420_rotate = static_cast<uint8 *>(malloc(size));
uint8 * i420_rotate_Y = i420_rotate;
uint8 * i420_rotate_U = i420_rotate + size_Y;
uint8 * i420_rotate_V = i420_rotate + size_Y + size_U;
libyuv::I420Rotate(i420_Y, width,
i420_U, width >> 1,
i420_V, width >> 1,
i420_rotate_Y, height,
i420_rotate_U, height >> 1,
i420_rotate_V, height >> 1,
width, height,
libyuv::kRotate90);
return i420_rotate;
}
注意,使用的是i420为数据源来进行旋转。
在rotate.h文件中都是关于旋转功能的函数:LIBYUV_API
int NV12ToI420Rotate(const uint8* src_y, int src_stride_y,
const uint8* src_uv, int src_stride_uv,
uint8* dst_y, int dst_stride_y,
uint8* dst_u, int dst_stride_u,
uint8* dst_v, int dst_stride_v,
int src_width, int src_height, enum RotationMode mode);
等等。
I420缩放
在scale.h文件中都是有关缩放功能的函数:typedef enum FilterMode {
// 执行速度依次递减,效果依次递增
// 单点采样
kFilterNone = 0,
// 单边滤波
kFilterLinear = 1,
// 双边滤波
kFilterBilinear = 2,
// 盒子滤波
kFilterBox = 3
} FilterModeEnum;
LIBYUV_API
int I420Scale(const uint8* src_y, int src_stride_y,
const uint8* src_u, int src_stride_u,
const uint8* src_v, int src_stride_v,
int src_width, int src_height,
uint8* dst_y, int dst_stride_y,
uint8* dst_u, int dst_stride_u,
uint8* dst_v, int dst_stride_v,
int dst_width, int dst_height,
enum FilterMode filtering);
想必这样格式的函数大致也清除了:
前6个参数,为原数据的Y、U、V分量和他们的宽度,在他们后面的则是他们目前的宽高值
而在第9到第14位的参数则是缩放后的Y、U、V分量和他们的宽度,因此这里的宽度是缩放后的数值需要注意,并且在他们后面的两个参数也是对应当前压缩后页面数据的宽高。
最后则是一个枚举类,他决定了4种缩放模式可供选择。kFilterNone、kFilterLinear、kFilterBilinear、kFilterBox。
例:uint8* I420Scale(uint8* i420, int width, int height, long size) {
jint size_Y = width * height;
jint size_U = (width >> 1) * (height >> 1);
uint8 * i420_Y = i420;
uint8 * i420_U = i420 + size_Y;
uint8 * i420_V = i420 + size_Y + size_U;
jint scale_Y = size_Y >> 1;
jint scale_U = size_U >> 1;
uint8 * i420_scale = static_cast<uint8 *>(malloc(size >> 1));
uint8 * i420_scale_Y = i420_scale;
uint8 * i420_scale_U = i420_scale + scale_Y;
uint8 * i420_scale_V = i420_scale + scale_Y + scale_U;
libyuv::I420Scale(i420_Y, width,
i420_U, width >> 1,
i420_V, width >> 1,
width, height,
i420_scale_Y, width >> 1,
i420_scale_U, width >> 2,
i420_scale_V, width >> 2,
width >> 1, height,
libyuv::kFilterNone);
return i420_scale;
}
镜像
在planar_functions.h中就有关于镜像的功能。LIBYUV_API
int I420Mirror(const uint8* src_y, int src_stride_y,
const uint8* src_u, int src_stride_u,
const uint8* src_v, int src_stride_v,
uint8* dst_y, int dst_stride_y,
uint8* dst_u, int dst_stride_u,
uint8* dst_v, int dst_stride_v,
int width, int height);
相信这种参数模式我们已经见了很多了。
前6个参数为原数据的Y、U、V分量和他们各自的宽度。
第7到第12的6个参数为镜像后的Y、U、V分量和他们各自的宽高。
最后两个参数也即当前图片的宽高。
例:uint8* I420Mirror(uint8* i420, int width, int height, long size) {
jint size_Y = width * height;
jint size_U = (width >> 1) * (height >> 1);
uint8 * i420_Y = i420;
uint8 * i420_U = i420 + size_Y;
uint8 * i420_V = i420 + size_Y + size_U;
uint8 * i420_mirror = static_cast<uint8 *>(malloc(size));
uint8 * i420_mirror_Y = i420_mirror;
uint8 * i420_mirror_U = i420_mirror + size_Y;
uint8 * i420_mirror_V = i420_mirror + size_Y + size_U;
libyuv::I420Mirror(i420_Y, width,
i420_U, width >> 1,
i420_V, width >> 1,
i420_mirror_Y, width,
i420_mirror_U, width >> 1,
i420_mirror_V, width >> 1,
width, height);
return i420_mirror;
}
在该文件中还有拷贝的功能函数:LIBYUV_API
int I420Copy(const uint8* src_y, int src_stride_y,
const uint8* src_u, int src_stride_u,
const uint8* src_v, int src_stride_v,
uint8* dst_y, int dst_stride_y,
uint8* dst_u, int dst_stride_u,
uint8* dst_v, int dst_stride_v,
int width, int height);
裁剪
裁剪可以使用ConvertToI420来完成。LIBYUV_API
int ConvertToI420(const uint8* src_frame, size_t src_size,
uint8* dst_y, int dst_stride_y,
uint8* dst_u, int dst_stride_u,
uint8* dst_v, int dst_stride_v,
int crop_x, int crop_y,
int src_width, int src_height,
int crop_width, int crop_height,
enum RotationMode rotation,
uint32 format);
可以看到这里不止是裁剪,并且可以对图片进行旋转功能。(先裁剪后旋转)
前两个参数为原数据,和他的大小,呼应这个数据的类型,则是在最后一个参数需要选择该原数据。
第3到第8,6个数据则是转换后数据的Y、U、V分量和他们各自在裁剪并旋转后的宽度。
crop_x & crop_y 为裁剪的起始位置,坐标起始点以左上角为(0,0)开始计算。
src_width & src_height 为原数据图片的宽高
crop_width & crop_height 为裁剪后未旋转的图片宽高
最后则是旋转的大小和上述提到原图的格式
例:
这里完成一个图片的裁剪和90度旋转功能。uint8* I420Crop(uint8* i420, int width, int height, int left, int top, long size) {
// 必须为偶数,否则会有锯齿
if (left % 2 != 0 || top % 2 != 0) {
return NULL;
}
jint size_Y = width * height;
jint size_U = (width >> 1) * (height >> 1);
uint8 * i420_Y = i420;
uint8 * i420_U = i420 + size_Y;
uint8 * i420_V = i420 + size_Y + size_U;
jint crop_width = width - left;
jint crop_height = height - top;
jint size_crop_Y = crop_width * crop_height;
jint size_crop_U = (crop_width >> 1) * (crop_height >> 1);
uint8 * i420_crop = static_cast<uint8 *>(malloc((3 * size_crop_Y) >> 1));
uint8 * i420_crop_Y = i420_crop;
uint8 * i420_crop_U = i420_crop + size_crop_Y;
uint8 * i420_crop_V = i420_crop + size_crop_Y + size_crop_U;
libyuv::ConvertToI420(i420, size,
i420_crop_Y, crop_height,
i420_crop_U, crop_height >> 1,
i420_crop_V, crop_height >> 1,
left, top,
width, height,
crop_width, crop_height, // 裁剪后宽高
libyuv::kRotate90, libyuv::FOURCC_I420);
return i420_crop;
}
需要注意设置裁剪后的宽高,对应匹配。